
RiteTemp Thermostat User Manual: A Comprehensive Guide
Welcome! This manual details operation‚ installation‚ and troubleshooting for RiteTemp thermostats‚ including popular models like 8022c and 8035C․
RiteTemp thermostats are designed for reliable and efficient home climate control‚ offering a range of programmable and non-programmable models to suit diverse needs․ From basic functionality to advanced scheduling options‚ RiteTemp aims to provide comfortable temperatures while optimizing energy usage․
This manual serves as a comprehensive guide to understanding and utilizing your RiteTemp thermostat effectively․ Whether you’re a first-time user or familiar with programmable thermostats‚ this resource will walk you through initial setup‚ operation‚ advanced features‚ and troubleshooting․
RiteTemp’s commitment to quality and user-friendliness ensures a seamless experience‚ helping you maintain a cozy and energy-efficient home environment․ Explore the possibilities and unlock the full potential of your RiteTemp thermostat!
Understanding Your RiteTemp Model (8022c‚ 8035C & Others)
RiteTemp offers a variety of thermostat models‚ each with unique features․ The 8022c is a popular programmable option‚ allowing customized heating and cooling schedules․ The 8035C is a universal‚ 7-day programmable model known for its versatility and ease of use․ Other models may include non-programmable options for simpler temperature control․
Key differences between models lie in programming capabilities‚ display features‚ and compatibility with various HVAC systems․ Before proceeding‚ identify your specific model number – typically found on the thermostat’s faceplate or back․ This manual provides general guidance‚ but some features may vary depending on your model․
Understanding your model’s specific features will ensure optimal performance and allow you to tailor the settings to your comfort preferences․
Initial Setup and Installation
Before installation‚ ensure your HVAC system is powered off at the breaker․ This initial setup involves both mounting the thermostat and correctly wiring it to your system․ Carefully review the wiring diagram specific to your RiteTemp model․ Incorrect wiring can damage your HVAC equipment or the thermostat itself․

Compatibility is crucial; confirm your system’s voltage and wiring configuration aligns with the thermostat’s requirements․ If unsure‚ consult a qualified HVAC technician․ Proper mounting ensures accurate temperature sensing and stable operation․ Follow the included mounting instructions precisely‚ using appropriate screws and anchors․
Double-check all connections before restoring power․ A secure installation is vital for reliable performance․
Mounting the Thermostat
Select a location away from direct sunlight‚ drafts‚ and heat-generating appliances for accurate temperature readings․ The thermostat should be mounted approximately 5 feet from the floor․ Use the provided mounting plate as a template to mark the screw holes on the wall․
Drill pilot holes and insert appropriate wall anchors if necessary‚ ensuring a secure fit․ Attach the mounting plate to the wall using the provided screws․ Gently snap the RiteTemp thermostat onto the mounted plate․ Ensure it’s firmly seated and level․
Avoid mounting near doorways or windows․ A stable‚ well-positioned mount is crucial for optimal performance and longevity of your thermostat․

Wiring Considerations & Compatibility
Before wiring‚ always turn off power to your heating/cooling system at the breaker box․ Identify your existing wiring – common terminals include Rh‚ Rc‚ W‚ Y‚ G‚ and C․ A “C” wire (common wire) is often required for consistent power․
RiteTemp thermostats are generally compatible with most 24V heating and cooling systems‚ including gas‚ oil‚ and electric․ However‚ compatibility can vary․ Consult a qualified HVAC technician if unsure․ Incorrect wiring can damage your system or thermostat․
Carefully connect the wires to the corresponding terminals on the thermostat baseplate‚ following the wiring diagram included with your specific model․ Double-check all connections before restoring power․
Powering On and Basic Operation
After installation and wiring‚ restore power to your HVAC system․ The RiteTemp thermostat should power on automatically‚ displaying the current room temperature and setpoint․ Use the “Up” and “Down” buttons to adjust the desired temperature․ The display will show the set temperature‚ and the system will activate to reach it․
The “Mode” button allows you to select between Heat‚ Cool‚ Auto‚ and Off․ In “Auto” mode‚ the thermostat automatically switches between heating and cooling to maintain the set temperature․ Familiarize yourself with the display icons‚ which indicate the current operating mode and system status․
Basic operation involves setting the desired temperature and selecting the appropriate mode for your comfort needs․
Programming Your RiteTemp Thermostat
RiteTemp thermostats offer programmable features for energy savings and customized comfort․ To begin‚ access the programming mode via the “Program” or “Set” button – consult your specific model’s display for the correct prompt․ First‚ set the current date and time accurately; this is crucial for schedule functionality․
Creating a basic schedule involves defining different temperature settings for various times of the day․ You can typically set separate temperatures for Wake‚ Leave‚ Return‚ and Sleep periods․ Repeat this process for each day of the week‚ or utilize the 7-day programmable options for greater control․
Save your schedule after programming to activate it․
Setting the Date and Time
Accurate date and time settings are fundamental for proper scheduling with your RiteTemp thermostat․ Begin by entering the programming mode‚ usually accessed via a “Menu” or “Set” button – refer to your model’s specific instructions․ Navigate to the “Date” setting using the up/down arrow keys․ Use the same keys to adjust the month‚ day‚ and year‚ confirming each selection․
Next‚ proceed to the “Time” setting․ Adjust the hour and minute‚ paying attention to AM/PM indicators․ Some models may require a separate setting for daylight saving time․ Confirm all entries before exiting the programming mode․
Correct time ensures your programmed schedules activate at the intended times․
Creating a Basic Schedule
Establishing a basic schedule allows your RiteTemp thermostat to automatically adjust temperatures‚ optimizing comfort and energy savings․ Access the scheduling mode through the “Menu” or “Program” button․ Typically‚ you’ll define separate settings for weekdays and weekends‚ or utilize a 7-day programming option for greater control․
For each period (e․g․‚ Wake‚ Leave‚ Return‚ Sleep)‚ set your desired temperature․ Consider lower temperatures during unoccupied periods and comfortable settings when at home․ Use the arrow keys to adjust temperatures and confirm each setting․
Review the complete schedule before saving․ A well-planned schedule significantly reduces energy consumption․
Advanced Programming Features
RiteTemp thermostats offer features beyond basic scheduling for enhanced control․ Explore 7-Day Programmable Options‚ allowing unique temperature settings for each day of the week‚ catering to varied routines․ The Temperature Hold Functionality temporarily overrides the programmed schedule‚ maintaining a set temperature for a specified duration – ideal for unexpected events or extended absences․
Some models include smart recovery‚ learning your heating/cooling patterns․ Utilize these features through the thermostat’s menu system‚ consulting your specific model’s documentation for detailed instructions․ Advanced settings maximize energy efficiency and personalize your comfort levels․

7-Day Programmable Options
RiteTemp’s 7-day programming allows customized temperature schedules for each day of the week․ This feature moves beyond simple weekday/weekend settings‚ accommodating truly unique lifestyles․ Program different wake‚ leave‚ return‚ and sleep temperatures for every day‚ optimizing comfort and energy savings․
Access this functionality through the thermostat’s menu‚ typically under “Schedule” or “Program․” Each day presents four programmable periods․ Carefully consider your daily routines when setting temperatures․ For example‚ lower temperatures while away and during sleep‚ increasing them before waking and upon returning home․ This granular control maximizes efficiency․

Temperature Hold Functionality
RiteTemp thermostats offer a “Hold” function‚ overriding the programmed schedule for a specified duration or indefinitely․ This is ideal for unexpected schedule changes – a spontaneous evening out‚ or guests arriving․ Activating “Hold” maintains a chosen temperature‚ ignoring the pre-set program until cancelled․
Typically‚ a “Hold” button or menu option initiates this feature․ You’ll then input the desired temperature․ Some models offer “Temporary Hold‚” reverting to the schedule at the next programmed period‚ while “Permanent Hold” requires manual cancellation․ Remember to deactivate “Hold” to resume automated temperature control and maximize energy efficiency;
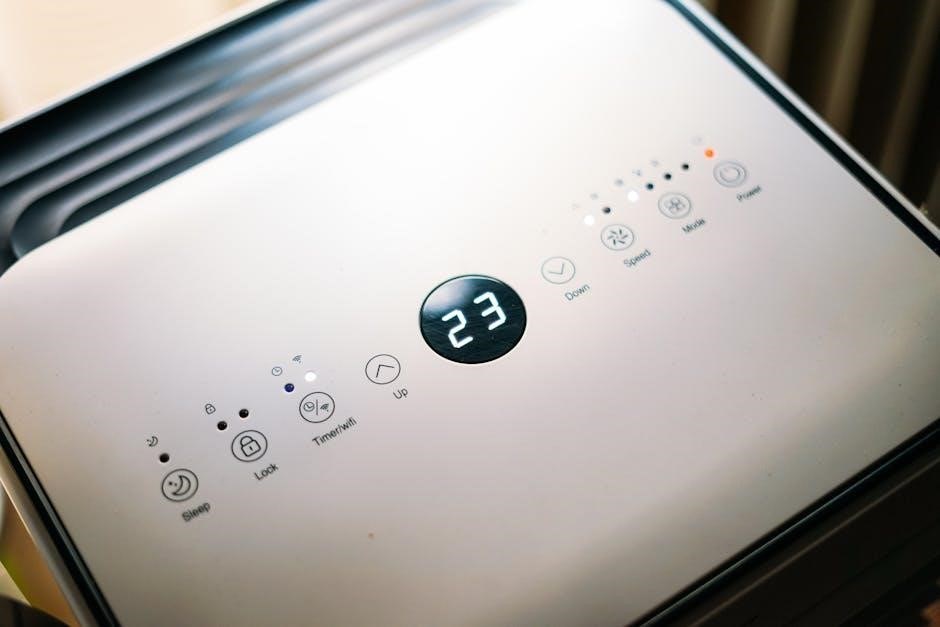
Understanding the Display Icons
RiteTemp thermostat displays utilize various icons to communicate system status․ A flame icon indicates the heating system is active‚ while a snowflake signifies cooling․ A fan icon shows the fan is running‚ and its status (auto or on) is often indicated by additional symbols․
Battery icons alert you to low battery levels‚ prompting replacement․ Icons representing programmed modes (Auto‚ Heat‚ Cool‚ Off) clearly display the current operating setting․ A clock icon confirms the time is set correctly․ Understanding these icons is crucial for interpreting your thermostat’s operation and responding to any system alerts effectively․ Refer to your specific model’s documentation for a complete icon glossary․
Using the Override Function
RiteTemp thermostats feature an override function‚ allowing temporary adjustments to the programmed schedule․ This is useful for unexpected changes in occupancy or comfort preferences․ Typically‚ pressing the “Hold” or “Override” button activates this feature․
You can then adjust the temperature to your desired setting․ The thermostat will maintain this temperature for a specified duration‚ or until you manually cancel the override․ The display will usually indicate that the override is active․ Remember to deactivate the override to resume the regular programmed schedule․ This function provides convenient‚ short-term control without permanently altering your settings․
Troubleshooting Common Issues
Common problems with RiteTemp thermostats include units failing to power on‚ often due to battery depletion or wiring issues․ Incorrect temperature readings can stem from thermostat placement – avoid direct sunlight or drafts․ If the thermostat isn’t responding‚ check the circuit breaker․
For unresponsive displays‚ try replacing the batteries․ If programming seems erratic‚ a reset might be necessary․ Ensure proper wiring connections according to the installation guide․ If issues persist‚ consult the full user manual or contact RiteTemp support․ Regularly maintaining your thermostat ensures optimal performance and longevity‚ preventing costly repairs․
Thermostat Not Turning On
If your RiteTemp thermostat isn’t powering on‚ begin by checking the batteries – replace them with fresh ones‚ ensuring correct polarity․ Next‚ verify the circuit breaker controlling the HVAC system hasn’t tripped․ Inspect the wiring connections at the thermostat and the furnace/air handler; loose wires are a frequent cause․
Confirm the thermostat is securely mounted and receiving power․ A blown fuse within the HVAC system could also be the culprit․ If these steps don’t resolve the issue‚ consult the wiring diagram in your manual to confirm compatibility․ If problems continue‚ professional HVAC assistance may be required․
Incorrect Temperature Readings
If your RiteTemp thermostat displays inaccurate temperatures‚ first ensure it isn’t directly exposed to sunlight‚ drafts‚ or heat-generating appliances․ These external factors can significantly skew readings․ Check for obstructions blocking airflow around the thermostat․ Verify the thermostat is calibrated correctly; some models allow for temperature offset adjustments within the settings menu․

Confirm the thermostat’s location isn’t near exterior walls or poorly insulated areas․ A faulty temperature sensor within the unit could also be the cause‚ potentially requiring professional repair or replacement․ Recalibrating or resetting the thermostat might resolve minor discrepancies․
Battery Replacement and Maintenance
RiteTemp thermostats‚ particularly programmable models‚ often rely on batteries for backup and operation․ Regularly inspect the battery level indicated on the display․ When the low battery icon appears‚ promptly replace the batteries with fresh alkaline batteries of the correct size – typically AA or AAA․ Avoid using rechargeable batteries‚ as they may not provide sufficient voltage․
To maintain optimal performance‚ periodically clean the thermostat’s exterior with a soft‚ dry cloth․ Do not use water or cleaning solutions․ Ensure the thermostat is free from dust and debris․ Proper battery maintenance ensures continued accurate temperature control and prevents unexpected system disruptions․
Resetting Your RiteTemp Thermostat
Resetting your RiteTemp thermostat can resolve certain operational issues or restore factory settings․ Before resetting‚ note any custom programming‚ as it will be lost․ The reset procedure varies by model; consult your specific model’s documentation․ Generally‚ it involves holding a ‘Reset’ button (if available) for a specified duration – often 5-10 seconds․

Alternatively‚ some models require disconnecting power (removing batteries or switching off the breaker) for a period‚ then restoring it․ After a reset‚ you’ll need to re-enter the date‚ time‚ and reprogram your desired schedule․ A reset returns the thermostat to its original configuration‚ addressing potential software glitches and ensuring optimal functionality․
Understanding SAF (Sustainable Aviation Fuel) & its Relevance (Contextual ー due to search results)
While seemingly unrelated to thermostats‚ discussions surrounding Sustainable Aviation Fuel (SAF) highlight a growing focus on sustainability and efficiency․ SAF offers significant non-CO2 emission benefits‚ improving air quality by reducing pollution – a parallel to optimizing home energy use with efficient climate control․ Current SAF usage remains limited‚ around one percent in Europe‚ but research emphasizes its potential for rapid decarbonization․
SAF production pathways include biofuels and e-fuels‚ representing a shift towards renewable energy sources․ This broader context of sustainable practices underscores the value of energy-saving devices like programmable RiteTemp thermostats‚ contributing to a more environmentally conscious lifestyle․
Non-CO2 Emission Benefits of SAF
Research consistently demonstrates that utilizing Sustainable Aviation Fuel (SAF) yields positive effects beyond carbon dioxide reduction‚ specifically concerning non-CO2 emissions․ These benefits directly impact air quality‚ leading to reduced pollution levels – a crucial aspect of environmental sustainability․ SAF’s composition influences particle formation and contrail characteristics‚ lessening their climate impact․
The aviation sector’s path to decarbonization relies heavily on these advantages‚ alongside carbon benefits․ SAF and fuel reformulation offer a dual approach to minimizing environmental harm․ Understanding these non-CO2 advantages reinforces the importance of seeking efficient solutions‚ much like choosing a programmable RiteTemp thermostat for optimized home energy management․
SAF Production Pathways & Current Usage
Currently‚ Sustainable Aviation Fuel (SAF) represents only a small fraction – approximately one percent – of the total fuel consumed by European airlines․ This highlights the need for increased production and adoption․ SAF production pathways are diverse‚ encompassing both biofuels derived from sustainable feedstocks and synthetic e-fuels created using renewable energy sources․
These pathways include utilizing waste oils‚ agricultural residues‚ and even capturing carbon dioxide directly from the atmosphere․ While promising‚ scaling up SAF production presents significant challenges․ Just as a RiteTemp thermostat efficiently manages energy‚ SAF aims to optimize fuel usage and reduce environmental impact‚ requiring continued innovation and investment for widespread implementation․
EU SAF Allowances Scheme (Contextual ‒ due to search results)
The European Union’s SAF Allowances scheme is a crucial initiative designed to accelerate the uptake of sustainable aviation fuels․ This session will cover the scheme’s objectives‚ focusing on incentivizing airlines to utilize SAF blends in their operations․ Key aspects include detailed eligibility criteria for SAF producers and suppliers‚ ensuring genuine sustainability․
The methodology for calculating allowance allocations will be explained‚ alongside the application process for airlines seeking to benefit from the scheme․ Similar to how a RiteTemp thermostat optimizes home climate control‚ this scheme aims to regulate and improve the aviation industry’s environmental performance‚ driving a transition towards cleaner air travel․
Accessing Google Account Features (Contextual ‒ due to search results)
Having a Google Account unlocks a suite of powerful tools‚ much like a RiteTemp thermostat unlocks precise home climate control․ If you utilize Gmail‚ you already possess a Google Account‚ granting access to services like Google Drive‚ Docs‚ Calendar‚ and more – all at no additional cost․
To sign in to Gmail‚ remember to prioritize security‚ especially on public computers․ Always ensure you sign out before leaving a shared device․ Google provides resources to guide secure login procedures on unfamiliar devices․ Just as a RiteTemp thermostat simplifies temperature management‚ Google aims to streamline your digital life with integrated‚ accessible features․
RiteTemp Best Selling Models
RiteTemp consistently delivers reliable and user-friendly thermostats‚ with several models proving particularly popular among consumers․ The RiteTemp 8022c Programmable Thermostat in white (model 781-733) is a top seller‚ currently available for $134․00 new or $39․99 used․

Another frequently purchased option is the Ritetemp Universal Thermostat‚ a 7-day programmable model 8035C․ These models offer a balance of functionality and affordability‚ making them ideal for a wide range of homes․ Exploring these best-selling options is a great starting point when choosing a RiteTemp thermostat to optimize your home’s comfort and energy efficiency․
Where to Find Additional Support
For comprehensive assistance beyond this manual‚ several resources are readily available․ If you utilize Gmail‚ you already possess a Google account‚ granting access to numerous Google products like Drive and Calendar at no extra cost․ Accessing these features can streamline your smart home integration․
Furthermore‚ exploring online forums and communities dedicated to home automation and HVAC systems can provide valuable insights and troubleshooting tips from fellow users․ Remember to consult official RiteTemp documentation and frequently asked questions sections on their website for specific model support․ Don’t hesitate to reach out to customer service for personalized guidance․
Warranty Information

RiteTemp thermostats are backed by a limited warranty against defects in materials and workmanship‚ ensuring product reliability․ The duration of the warranty varies depending on the specific model purchased; please retain your proof of purchase for verification․ This warranty covers repair or replacement of the unit‚ at RiteTemp’s discretion‚ should a covered defect arise during the warranty period․
The warranty does not cover damage resulting from improper installation‚ misuse‚ abuse‚ or unauthorized modifications․ For detailed warranty terms and conditions‚ including claim procedures‚ please visit the official RiteTemp website or contact their customer support team․ Maintaining records and following guidelines is crucial․