
Understanding the Exposure Triangle: ISO, Aperture, and Shutter Speed
Understanding the interplay between ISO, aperture, and shutter speed is crucial; readily available chart resources, often in PDF format, simplify these settings for various photographic scenarios.
What is the Exposure Triangle?
The exposure triangle represents the fundamental relationship between ISO, aperture, and shutter speed – three settings that collectively determine the brightness, or exposure, of your photographs. Mastering this triangle is essential for moving beyond automatic camera modes and achieving creative control. Each element influences the others; altering one necessitates adjustments to the remaining two to maintain a balanced exposure.
ISO controls the camera’s sensitivity to light, aperture dictates the amount of light entering the lens, and shutter speed governs the duration of light exposure on the sensor. Numerous resources, including downloadable charts in PDF format, visually illustrate these connections. These charts often present recommended settings for diverse shooting conditions, offering a quick reference for beginners. Understanding this interplay empowers photographers to intentionally manipulate these settings for artistic effect, like creating motion blur or achieving a shallow depth of field.
The Interrelationship of ISO, Aperture, and Shutter Speed
ISO, aperture, and shutter speed aren’t isolated settings; they’re interconnected components of exposure. Increasing ISO allows for faster shutter speeds or narrower apertures in low light, but introduces noise. Widening the aperture (lower f-stop) lets in more light, enabling faster shutter speeds or lower ISO, but reduces depth of field. Conversely, a slower shutter speed allows more light, useful with lower ISO and smaller apertures, but risks motion blur.
Exposure charts, frequently available as PDF downloads, visually demonstrate these relationships. They showcase how adjusting one setting impacts the others to achieve proper exposure. These charts often provide starting points for various scenarios – daylight, low light, action shots – simplifying the learning process. Mastering this interplay is key to creative control, allowing photographers to prioritize specific elements like sharpness, brightness, or motion.

ISO Explained
ISO measures a camera’s sensitivity to light; charts, often in PDF form, illustrate how ISO interacts with aperture and shutter speed for optimal exposure.
What is ISO and How Does it Work?
ISO, in digital photography, represents the sensitivity of your camera’s sensor to light. A lower ISO, like 100 or 200, means the sensor is less sensitive, requiring more light for a proper exposure – ideal for bright, sunny conditions. Conversely, a higher ISO, such as 800, 1600, or even higher, increases the sensor’s sensitivity, allowing you to shoot in darker environments.
However, increasing ISO comes with a trade-off: image noise, or graininess. While modern cameras handle higher ISO values much better than older models, pushing the ISO too high can result in a noticeable loss of image quality. Understanding this relationship is key to balancing exposure and image clarity.
Many photographers utilize ISO charts, frequently available as downloadable PDF guides, alongside aperture and shutter speed references, to quickly determine appropriate settings for diverse shooting scenarios. These charts help visualize how ISO impacts the final image, especially when combined with adjustments to aperture and shutter speed.
Common ISO Values and Their Uses
ISO 100-200 is generally used in bright daylight conditions, providing the cleanest image quality with minimal noise. ISO 400 is suitable for overcast days or well-lit indoor environments, offering a good balance between light sensitivity and image quality. As light diminishes, ISO 800-1600 becomes useful for indoor photography without flash, or for capturing action in moderately lit situations;
For low-light scenarios like concerts or nighttime photography, ISO 3200 and above may be necessary, accepting the trade-off of increased noise. Many photographers consult ISO, aperture, and shutter speed charts – often found as convenient PDF downloads – to quickly select appropriate values based on the shooting environment.
These charts illustrate how different ISO settings interact with aperture and shutter speed to achieve proper exposure, helping photographers avoid underexposed or overexposed images and maintain desired image quality.
ISO and Image Noise
ISO directly impacts image noise; higher ISO settings amplify the signal, but also amplify noise – appearing as graininess or speckling in the image. Lower ISO values (like 100 or 200) produce cleaner images, ideal for well-lit conditions. As ISO increases (e.g., 3200, 6400), noise becomes more prominent, potentially reducing image detail and sharpness.
Understanding this trade-off is crucial. Many photographers utilize ISO, aperture, and shutter speed charts – frequently available as downloadable PDF guides – to visualize the relationship between these settings and noise levels. These charts help determine the highest usable ISO for a given camera and desired image quality.
Modern cameras handle high ISO performance better, but noise remains a consideration, especially for critical applications where image clarity is paramount.
Aperture Explained
Aperture controls light intake and depth of field; charts, often in PDF form, illustrate f-stop values and their impact alongside ISO and shutter speed.
What is Aperture and How Does it Work?
Aperture refers to the opening within a camera lens that controls the amount of light reaching the image sensor. It’s expressed in f-stops (like f/2.8, f/5.6, f/11), with lower numbers indicating a wider opening and more light, while higher numbers signify a narrower opening and less light.
Think of it like the pupil of your eye – it expands in dim light and contracts in bright light. A wider aperture creates a shallow depth of field, blurring the background and isolating the subject, often used in portraiture. Conversely, a narrow aperture yields a greater depth of field, keeping more of the scene in focus, ideal for landscapes.
Understanding how aperture interacts with ISO and shutter speed is key to achieving proper exposure. Many resources, including downloadable charts in PDF format, visually demonstrate these relationships, helping photographers quickly select appropriate settings for different shooting conditions. These charts often show how changing the aperture affects both exposure and depth of field, alongside corresponding ISO and shutter speed adjustments.
F-Stops and Depth of Field
F-stops directly correlate with depth of field – the area in your image that appears acceptably sharp. Lower f-stop numbers (e.g., f/1.8, f/2.8) create a shallow depth of field, ideal for isolating subjects with blurred backgrounds, often called ‘bokeh’. Higher f-stop numbers (e.g., f/8, f/16) produce a large depth of field, keeping more of the scene in focus, perfect for landscapes.
A chart illustrating f-stops and their corresponding depth of field is invaluable. Many photographers utilize PDF resources that visually map these relationships, alongside suggested ISO and shutter speed settings. These charts demonstrate how a smaller aperture (higher f-stop) increases the area in focus, while a larger aperture (lower f-stop) decreases it.
Mastering f-stops allows for creative control over your images, influencing how viewers perceive the scene and emphasizing specific elements. Understanding this interplay, often visualized in exposure charts, is fundamental to photographic artistry.
Aperture Values and Creative Effects (e.g., Bokeh)
Aperture values profoundly impact creative effects, most notably bokeh – the aesthetically pleasing blur in out-of-focus areas. Wider apertures (lower f-numbers like f/1.4 or f/2.8) generate stronger bokeh, beautifully isolating subjects. Narrower apertures (higher f-numbers like f/11 or f/16) minimize bokeh, ensuring greater sharpness throughout the image.
ISO and shutter speed must be adjusted in tandem with aperture to maintain proper exposure. Exposure charts, often available as PDF downloads, visually represent these relationships. These charts help photographers quickly determine appropriate settings for desired creative effects.
Experimenting with different aperture values unlocks artistic possibilities; A chart can serve as a starting point, but understanding how aperture interacts with ISO and shutter speed is key to achieving your vision;
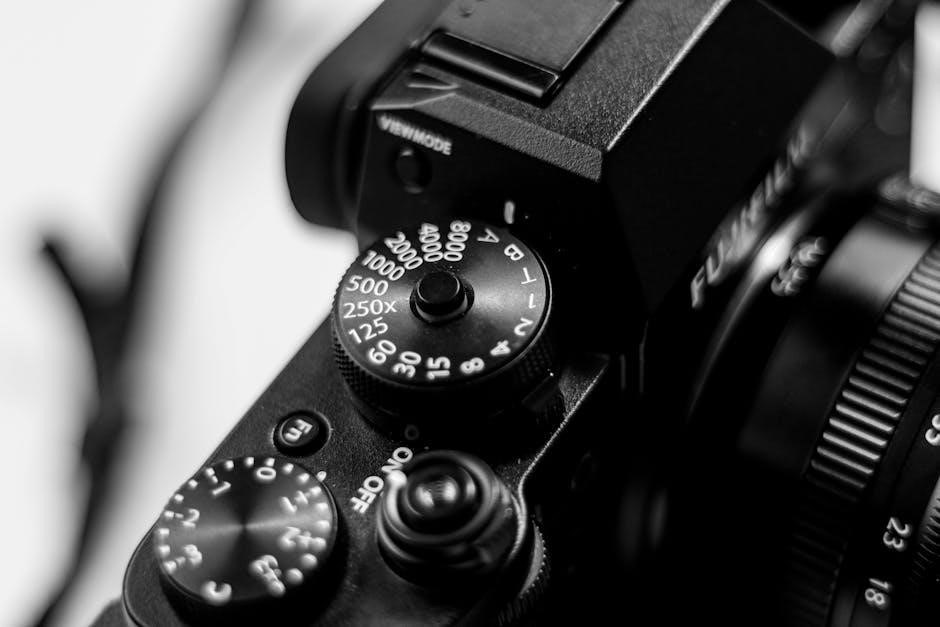
Shutter Speed Explained
Shutter speed dictates how long the camera’s sensor is exposed to light, influencing motion depiction; charts, often in PDF form, illustrate optimal settings.
What is Shutter Speed and How Does it Work?
Shutter speed represents the duration for which the camera sensor is exposed to light, measured in seconds or fractions of a second. Essentially, it’s the length of time the camera “sees” the scene. A faster shutter speed, like 1/1000th of a second, captures a fleeting moment, effectively freezing motion. Conversely, a slower shutter speed, such as 1 second, allows more light in, resulting in motion blur.
Understanding this is vital for controlling the look of your images. For instance, capturing a fast-moving sports event requires a rapid shutter speed to avoid blur, while photographing a waterfall might benefit from a slower speed to create a silky, smooth effect. Many resources, including downloadable charts often available as PDFs, visually demonstrate the relationship between shutter speed, aperture, and ISO, aiding in selecting the appropriate settings for diverse scenarios. These charts help photographers quickly reference ideal combinations for achieving desired results.
Common Shutter Speed Values and Their Uses
Common shutter speeds and their applications are frequently summarized in photography exposure charts, often available as convenient PDF downloads. For example, 1/1000s and faster are ideal for freezing fast action – sports, wildlife. 1/250s to 1/500s work well for general daytime photography, capturing everyday scenes with clarity.
Slower speeds, like 1/60s to 1/125s, require steadier hands or a tripod to avoid blur, suitable for portraits or lower-light situations. Below 1/60s, a tripod is almost essential. Speeds of 1 second or longer are used for intentional motion blur, light painting, or astrophotography. Understanding how these speeds interact with aperture and ISO, as illustrated in exposure charts, is key to achieving proper exposure and creative effects. These charts provide a quick reference for balancing these three elements.
Shutter Speed and Motion Blur/Freezing Action
Shutter speed dramatically impacts how motion is captured; quick reference charts, often in PDF format, illustrate this relationship. Fast shutter speeds (e.g., 1/500s, 1/1000s) “freeze” action, ideal for sports or wildlife photography, preventing blur. Conversely, slower shutter speeds (e.g., 1/30s, 1 second) create motion blur, conveying a sense of movement – useful for waterfalls or light trails.
The interplay with aperture and ISO is vital; exposure charts demonstrate how adjusting these settings compensates for shutter speed changes. For example, a slower shutter needs a wider aperture or higher ISO to maintain proper exposure. Intentional motion blur requires a tripod, while freezing action often demands a stable shooting position. Mastering this balance, guided by exposure charts, unlocks creative control.
ISO, Aperture, Shutter Speed Chart
Exposure charts, frequently available as downloadable PDF guides, visually represent the relationships between ISO, aperture, and shutter speed for balanced photography.
Reading a Photography Exposure Chart
Exposure charts, often found as convenient PDF downloads, are essential tools for photographers seeking mastery over manual settings. These charts typically organize ISO values, aperture settings (f-stops), and shutter speed options in a grid or table format. Understanding how to interpret these charts unlocks creative control.
Generally, charts demonstrate how different combinations of settings achieve the same exposure level. For instance, decreasing the aperture (higher f-stop) requires a slower shutter speed or a higher ISO to maintain proper brightness. Conversely, increasing ISO necessitates faster shutter speeds or narrower apertures. Charts often highlight ‘normal’ or ‘base’ settings for various conditions, providing a starting point for adjustments.
Pay attention to columns or rows dedicated to specific scenarios – daylight, low light, action shots – as these offer tailored recommendations. Learning to ‘read’ these charts empowers photographers to quickly select appropriate settings, leading to consistently well-exposed and creatively compelling images.
Example Chart Values for Different Scenarios (Daylight, Low Light)
A typical ISO, aperture, and shutter speed chart (often available as a PDF) showcases varying settings for different shooting conditions. In bright daylight, a starting point might be ISO 100, aperture f/8, and shutter speed 1/250s. This provides ample detail and minimizes noise.
Transitioning to low light demands adjustments. An example setting could be ISO 800, aperture f/2.8, and shutter speed 1/60s. Increasing ISO compensates for reduced light, while a wider aperture (lower f-stop) allows more light to enter the lens. For action in low light, consider ISO 1600, f/2.8, and 1/125s.
Remember these are guidelines. Portraiture might favor ISO 200, f/4, and 1/100s for pleasing background blur. Landscape photography often benefits from ISO 100, f/11, and a slower shutter speed using a tripod.
PDF Resources for Downloadable Charts
Numerous websites offer free ISO, aperture, and shutter speed chart resources in PDF format. These downloadable guides are invaluable for photographers of all levels, providing quick reference points for various shooting scenarios. Websites like Photography Life and Digital Photography School frequently host these charts.
Searching online for “exposure triangle chart PDF” yields a wealth of options, ranging from basic beginner guides to more comprehensive resources detailing specific camera settings for different genres. Many camera manufacturers, such as Nikon and Canon, also provide downloadable PDFs on their support websites.
These PDFs often include example settings for daylight, low light, portraits, landscapes, and action photography, streamlining the learning process. Utilizing these readily available resources accelerates understanding and improves photographic outcomes.
Practical Applications & Scenarios
Applying the ISO, aperture, and shutter speed knowledge, aided by a handy chart (often a PDF), unlocks creative control in diverse photographic situations.
Landscape Photography Settings
For breathtaking landscapes, prioritize sharpness and depth of field. Utilize a lower ISO, typically 100, to minimize noise and maximize image quality. A mid-range aperture, such as f/8 to f/16, ensures greater depth of field, keeping both foreground and background elements in focus.
Shutter speed will vary depending on lighting conditions; a tripod is often essential for slower shutter speeds to prevent blur. Referencing an ISO, aperture, and shutter speed chart – frequently available as a downloadable PDF – can provide a solid starting point. Consider using a remote shutter release or the camera’s self-timer to further minimize camera shake. Experiment with different settings, but always aim for a balanced exposure that captures the scene’s full dynamic range.
Remember to check your histogram to ensure you aren’t clipping highlights or shadows.
Portrait Photography Settings
Achieving flattering portraits often involves a shallow depth of field to isolate the subject. Begin with a wider aperture, like f/1.8 to f/5.6, creating a beautifully blurred background – often referred to as bokeh. Keep the ISO as low as possible, ideally 100-400, to maintain image clarity and minimize noise.
Shutter speed should be fast enough to freeze any subject movement, typically 1/125s or faster. A handy ISO, aperture, and shutter speed chart (often found as a convenient PDF download) can guide your initial settings based on available light. Pay attention to your subject’s eyes; ensure they are sharp and in focus.
Experiment with different apertures to control the amount of background blur and find what best complements your subject.